Fitting a door into a door frame may seem straightforward, but it requires precision and attention to detail. A well-fitted door not only enhances the aesthetic appeal of your home but also ensures proper functionality. Whether you’re hanging a new door or adjusting an old one, this guide will walk you through the process of fitting a door perfectly into its frame.
Tools and Materials You’ll Need
Before you begin, ensure you have the following tools and materials:
- Measuring Tape: For accurate measurements.
- Pencil: To mark measurements and cutting lines.
- Chisel: To cut mortises for hinges.
- Hammer: For driving in screws and chiseling.
- Screws: For attaching hinges and handles.
- Drill and Bits: For pre-drilling holes and driving screws.
- Hand Saw or Circular Saw: For trimming the door as needed.
- Sandpaper or Planer: To smooth out edges after cutting.
- Level: To ensure the door hangs straight.
- Hinges: Typically two to three for a standard door.
Step 1: Measure the Door and Frame

Precise Measurements are Key
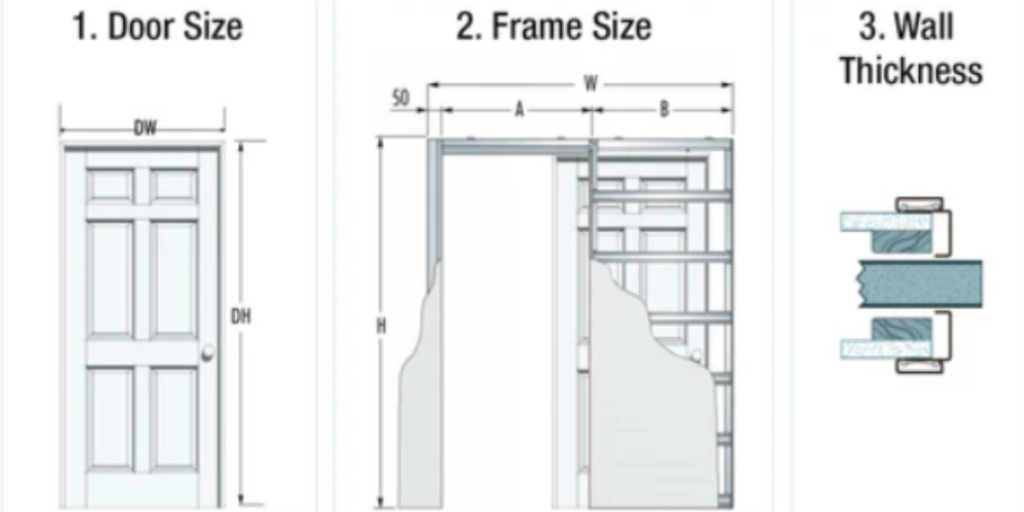
Start by measuring the door frame carefully. Use a measuring tape to get the exact width, height, and depth of the frame. Then, measure the door you plan to install, ensuring that it matches the frame size. If the door is larger than the frame, you may need to trim it down to fit.
Tip: Leave about a 2-3mm gap on all sides for the door to open and close smoothly.
Step 2: Trim the Door (If Needed)
Making the Right Cuts
If the door is too wide or too tall, mark the excess material that needs to be trimmed. Use a circular saw, hand saw, or table saw to make the cuts. Make sure to cut gradually and check the fit after each trim.
Tip: Always trim from the bottom of the door rather than the top, and use a planer for smaller adjustments.
Step 3: Prepare the Door for Hinges
Marking for Mortises
Lay the door on a flat surface and mark where the hinges will go. Typically, there are two to three hinges, with the top hinge located about 7 inches from the top of the door and the bottom hinge around 11 inches from the bottom.
Using a chisel, cut out shallow mortises where the hinges will sit. Ensure these mortises are deep enough to allow the hinge to sit flush with the surface of the door.
Step 4: Install Hinges
Securing the Hinges
After cutting the mortises, place the hinges in their positions and mark the screw holes. Pre-drill the holes to prevent the wood from splitting, and then attach the hinges to the door using screws. Make sure the hinges are tight but not overly tight to ensure smooth operation.
Step 5: Hang the Door in the Frame
Aligning and Securing
With the hinges securely attached, hold the door in the frame, aligning the hinges with the pre-existing hinge positions on the frame. Start by securing the top hinge with screws, then move on to the bottom hinge. Use a level to ensure the door is hanging straight.
Tip: You may need a second person to help hold the door while you attach it to the frame.
Step 6: Check the Fit
Testing the Door Functionality
Once the door is hung, open and close it a few times to check for any obstructions. The door should swing smoothly without rubbing against the frame. If it rubs against any side, you can either sand or plane the edges of the door or adjust the hinges for a better fit.
Step 7: Adjust the Latch and Handle
Ensuring Proper Alignment
If the latch or handle isn’t lining up with the strike plate, you may need to reposition either the latch or the plate. Mark where the latch hits the frame, and use a chisel to adjust the strike plate position as needed. Once aligned, screw it in securely.
Step 8: Final Touches
Sealing the Gaps
Finally, check for any gaps between the door and the frame. If the gaps are too wide, you can install weatherstripping around the edges to create a snug fit. Once you’re satisfied with the fit, fill any screw holes or chisel marks, and give the door a final sanding if needed.
Tip: A 1/2-inch gap should be left at the bottom to ensure clearance over the floor.
Common Problems When Fitting a Door and How to Fix Them
Door Doesn’t Close Properly
If the door doesn’t close flush within the frame, it might be too big. Trim the sides slightly or adjust the door stops to ensure a snug fit.
Door Rubbing on Top or Sides
This is usually a result of uneven hanging or a misaligned frame. Adjust the hinges by loosening or tightening the screws. If the rubbing persists, you may need to plane the door slightly.
Door Doesn’t Hang Square
An out-of-square door can be corrected by adjusting the trim or the casing around the frame. Sometimes, using wood shims on the hinge side helps to realign the door and frame.
Door Won’t Stay Closed
If your door swings open by itself, check the alignment of the latch and strike plate. Tighten or reposition the hinges if needed.
Door Doesn’t Sit Level
A door that isn’t level may require new, adjustable hinges that allow for vertical and horizontal alignment.
Final Thoughts
Fitting a door in a door frame may seem daunting, but with careful measurements and attention to detail, it can be a straightforward process. Always ensure that the door is level, well-trimmed, and that the hinges are securely fastened to achieve a perfect fit.
By following these steps, your door will fit seamlessly into its frame, improving the overall appearance and functionality of your space. With the right tools, materials, and a bit of patience, you’ll master the art of fitting doors in no time.
Related Article
6 Types of Garage Doors: What to Know and How to Choose the Right One
10 Essential Dos and Don’ts for Choosing the Perfect Front Door Color
Home Decor Article
White Quartz Countertops: What You Need to Know Before You Buy
Best Countertops for Kitchens and Bathrooms: A Comprehensive Guide
Matte Countertops vs. Glossy Countertops: The Ultimate Comparison Guide for Your Kitchen

